Let's get started!!!
You'll need:
• 1 Slim bodied WWE Elite figure (Rowdy Roddy Piper used here )
• 1 Dc Direct New Krypton Superman Head (Reeve Likeness)
• Aves Apoxie Sculpt or suitable subsitute air dry polymer clay
• A Dremel (For general smoothing and establishing your cape plaement)
• Acrylic paints: White | Black | Bright Blue | Bright Red | Bright Yellow
• Hobby Vinyl (for Superman emblem on chest)
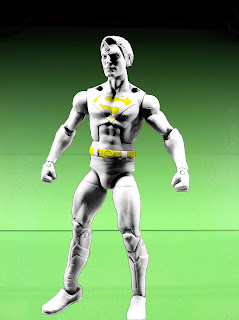
Lets take a look at our unpainted model to see what we've done here:
• Head is actually a custom casting. The New Krypton head had a more breezy look to it and it didnt really fit with the Reeve films hairdo.
• Emblem is a custom cut vinyl from a sign shop I used to work at BUT you can achieve this same result from using an exacto and sharpie finepoint marker with hobby vinyl (for gas powered RC Cars)
• The belt has been sculpted on the mid torso section above the briefs. That elongates the lower torso.
The lower legs have actually been dremelled down to thin out the calves and then sculpted over with Aves Apoxie Sculpt. I took a plastic spru and dremmeled a hole in the backs of the legs to keep the swivel joint in place so there's no break in the shin.
On to the Paints
I work from light to dark out of practicality for this
character. I start with my yellow to get the entire emblem (or just the insets as pictured) and the exposed sections of belt. It will take a few layers to get it at full saturation depending on what color primer you use. I've always used gray... could probably stand to use white really.
Red
Then move on the the reds. I use a mix of 90% red and 10% Yellow. That takes your already bright red just a hare over into a hot red (deep deep orange). I go over the emblem a few tmes with a fine point brush and trunks and boots.
This is also a good time to put the whites in the eyes before you move on to your flesh tone.
 Flesh Tone
On to the flesh tones. I create my flesh tone from red/yellow/white. Its a cheap way to get your own tone and you can always mix up and down to nail an existing tone as well.
 Blue
BlueNow its onto the major coverage... All that blue...
I use a mix of cobalt blue and white. It lets me control the brightness of that Reeve/Donner blue. I find it works nicely to go ahead and knock that hair out with blue as well. It gives it a natural shine there where some black may thin out. It makes for nice highlights.
 Black
BlackDon't forget your eyes. I actually take a dental pick and press into the sockets where I want my pupils. I press enough to make a pinhole in the eye. Then you can take that same pick with a dot of blue and drop your perfectly round irises in place. With the indention in the eye you wont even have to dot the pupils, they create their own light/shadow. You CAN however take that same pick/fine pointed tool and dip it in white and give the eyes that tiny sparkle that REALLY bumps the scale believability WAY UP...
The Cape... Oh boy the Cape...
I don't have much faith in glues or tapes when it comes to attaching fabric to plastic much less with a layer of paint in between. So I came up with the "PullThrough" cape setup.
These are inserted into the body and tied off in the back
 You'll need:
• Pack of ornament hooks (longer the better)
• Scotch Double Stick Tape (1/4" - 1/2")
• Cut fabric 6" x 6"
• Dental pick (fine pointed tool)
• Dremel (to make tie off points in the back)
• Needle Nose Pliers
• Hot Glue Gun

I take my square tailored for the scale of figure I'm using and roll the outside edges in just a little (about the width of a square of scotch double sided tape) and place the tape there in the topmost corner. Fold into position and press to establish the adhesive. This creates a reinforcement for the ornament hooks to pull the cape into the body. *Without the tape the wire will rip right through the fabric.
Then I take that same trusty dental pick and poke a hole into the center of both squares of tape with the fabric attached. this is where you will insert your ornament hooks to start to gather up the fabric to pull through.
Simply make a candy cane shape of each hook and loop them through the holes you've poked through the fabric and tape.
Twist the wire until it can be twisted no more(it helps to use the needle nose pliers for that).
Insert both ends into the two holes in the front of the figure and push them through the exit point in the back. Make sure the cape is clear of the head before you pull the fabric comlpetely through. Twist them together in the back with the pliers and cut off the excess wire that is NOT attached to the cape.
Once your cape has been pulled through and it looks good form the front... You Have Done IT!!!
Fill the exit cavity with hot glue and Voila!!! you are done. You can at this time press the cape into the hot glue to hold it in place OR leave it free to blow around either way once your to this point, it looks F'ing Aweome...
So there it is!!
Thanks for looking!!!
Be Sure and Check out my Deluxe Christopher Reeve Tutorials
Watch them Here!!


No comments:
Post a Comment